Just another free Blogger theme

Powered by Blogger.

Monday, February 24, 2014

This solid maple table was painted with
10 min dry EXCEL spray paint in Oyster Grey.

Its a beautiful color and the paint provides a
 remarkable hard, durable, and professional finish.
Unfortunetly it is hard to find and has a
very strong odor when first applied.


TEA ANYONE?
The view is amazing!

For more pieces finished in white:
http://blogspot.com/p/white.html

Im sharing the view at:
SAS InteriorsFurniture Feature Fridays
 
It can happen to you ...
 
 
This is the kind of thing that can happen in the blink of an eye!
It happens to the best of us even when we take precautions.
 
 
Youre sitting quietly one morning reading a magazine and you turn the page and gaze upon a photo
that starts the wheels turning in your head and before you know it the kitchen island is covered with 
your next project and in my case it was a collection of lamps.
I went mad with the idea to finally making new ones with all the parts after looking at 1 pretty picture.
You all know the scene and nice clean kitchen turns into bedlam all because you decided to take a
 moment for yourself.
 
 
Ornate lamps at the second hand stores around here are not that cheap so Im not sure why
I am constantly trying to save them when I only work with them a couple times a year.
Storing them takes a great deal of room but I do enjoy when I can rebuild beautiful new ones.
 
I took apart each lamp washing the glass bits in the sink as I went.
The metal parts were all taken outside to get sprayed white.
 
 
By the end of the day I was out of white spray paint and I had several glass cuts to my hands.


 I also ran out of my lamp shade trim but not before finishing these 2 chandelier lamps.
I will have more coming soon but I have more wiring to do and some trim to find.
 

These 2 are not completely identical, but a close second.
One is taller and the shade is slightly wider than the other.

 
All the crystals are glass and the bases are marble.
They are 100% recycled from other lamps.


Sunday, February 23, 2014

 
photo courtesy of Glam It Up Photography

The Chairs for Charity auction was a great success with my chair going to
Jen from Brick & Mortar.
The live auction chairs made approx. $1400 for the Langley Christmas Bureau,
I dont know the numbers for the rest of the chairs that were up for silent auction.
Thank you to everyone who participated, donated, and came out for the evening.
 
 
But its time to get to the nitty gritty ...
The ins and out ..... all my little secrets how you can create your own jack chair
 
 
***WARNING***
 
First of all let me say I have no formal training in upholstery,
I have always been too impatient to wait for someone to help me when I want to get a job accomplished.
I also like knowing how things work, thus why I use to take things apart as a child, like music boxes and flashlights.
I would tinker away for hours figuring out how each little part effected the next.
Its the exact same thing today, if I dont understand how something goes together
I take something similar apart and learn how to recreate it.
 
 
I was fortunate enough purchase this chair already stripped,
Ive said it many times in the past "the worst part of reupholstering is removing the old stuff"

 
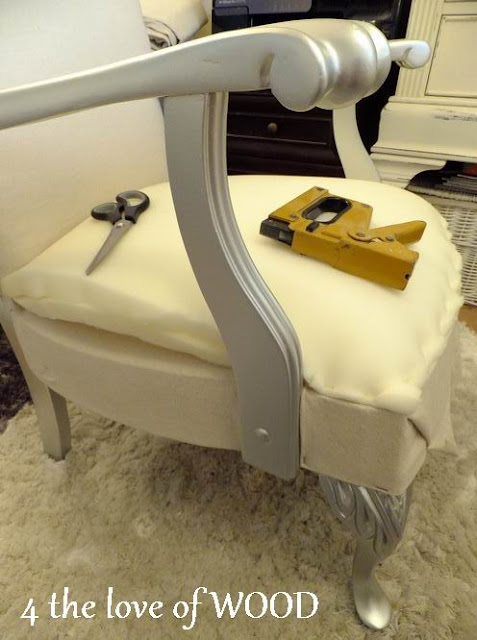
I started by stapling painters drop cloth over the springs and seat frame.

 
Next I hauled my roll of inch thick foam in to start cutting.
 
 
I ended up using 2 layers of foam for the seat.
Get your butt in the chair and test how it feels, as goldilocks would say
"thats just right"
 
 
One tip I have to offer here is to turn the square edge of the foam down while stapling.
this helps eliminate the corners being seen after the fabric goes on.

 
 After the foam is secured into place sheets of batten were wrapped over the foam,
this again softens the edges and disguises the staple indents.
 
 
I did not staple the batten as it stays in place on its own.

 
You can use scissors to cut your batten but tearing it helps thin the edges better. 

Now it was just a matter of cutting and stapling my material over the seat and backrest,
cutting to fit where necessary.
 
 
Im not an expert at fitting around the arms but I do my best.


The piece for the very back of the chair was cut 1 inch larger and in the shape of the back
then carefully secured into place with my trusty hammer and nail head trim.


I talk about the paint finish used on the frame here:
http://blogspot.ca/2012/10/silver-chair-how-to.html
and the Union Jack upholstery was done the same as these chairs:
http://blogspot.ca/2011/10/captain-and-his-soldiers-pt2-union-jack.html. 
 
 
photo courtesy of Glam It Up Photography
 

PLease let me know if you try making your own UNION JACK CHAIRS!

This post is supposed to be about how I did the Eiffel Tower dresser,
but something came up and I couldnt find the time to put all that info together yet.
 
 
With our beautiful fall weather comes soooo much rain.
So I have officially moved myself indoors to work but Monday the sun was shining
and I took advantage of it.

 
I was able to re purpose this lovely tallboy and get it painted all while enjoying that sun.

 
All the hardware used are vintage pieces and the paint distressed perfectly over the dark stain.

 
Its blue color is another kitchen counter ASCP mix.
When I am working with blues I usually start with Provence.